
まずはこの「空力ヤジロベイ」を実際につくってみて、座っている人、立っている人、大きい人、小さい人、元気な人、少しそうでない人など、さまざまな人が、誰でも簡単に、気楽に、空気そのものや、その空気の中を移動する「形」との関係を楽しんでもらえたらと考えています。
また、目に見える形をもつすべてのものにおいて定義することができ(流体ではなかなかイメージしにくいのですが)、同時に直接目で見ることはできない「重心」や「風圧中心」といった「力の中心」を感じ取るきっかけにもなればと思っています。素朴な手作り玩具であると同時に、力学教材の一つとなることを願っています。
First, by actually making this aerodynamic Japanese balancing toy known as a Yajirobei, I hope that anyone who is sitting or standing, big or small, energetic or not so much, can easily and comfortably enjoy the relationship between air itself and form moving within it.
I also hope that this experience will offer an opportunity to sense the “centers of force,” such as the center of gravity and the center of pressure, which cannot be seen directly, yet can be defined for all objects with visible form. At once a simple handmade toy and a teaching tool for mechanics, the Aerodynamic Yajirobei is intended to bridge intuitive play and physical understanding.

座ったままでもその飛行感覚を体感するためには,A5サイズ程度の大きさが良いようです。材質としては普通のコピー用紙が入手しやすく取っつき易いのですが,軟らかすぎで取り扱いが難しいところもあります。それでも,慣れてくればフラッター1のような動きも見隠れして,いろいろと興味深いところがあります。
To experience the sensation of flight even while remaining seated, a paper size of approximately A5 has proven to be suitable. Ordinary copy paper is easy to obtain and approachable as a material, but it is also rather too soft, which can make handling difficult. Even so, with some familiarity, flutter-like motions begin to appear intermittently, revealing a variety of intriguing behaviors.
紙飛行機=ケント紙とすると,このサイズ感の紙飛行機では重く,必要以上に硬くもあります。材料を何にするかで実は結構いろいろ繊細に体感できることが変わってくるのですが,まずはミスプリントしてしまったコピー用紙で,思い切り入門的なレベルですが,空気力学と剛体力学を楽しんでみようと思います。
In general, many people may think that Kent paper—a high-quality drawing paper commonly used in Japan—is the most suitable material for making a small model aircraft. However, it may be slightly too heavy to achieve a natural, free flight under gravity. In fact, the material of a small craft can significantly affect how the maker experiences the process of constructing it.
Here, I would like to present a way to enjoy aerodynamics and basic mechanical dynamics—albeit at a primitive level—using small aircraft made from scrap paper and similar readily available materials.
また,普通の,どちらかと言うと安めの,つまり薄めのコピー用紙を使うことの難しさの反面,実はその対策を取る過程で,構造力学的なセンスも刺激するような体験もできます。
Although such thin paper is easily found, it is more difficult to construct a paper aircraft from it. However, working with such a sensitive material may, in fact, enhance one’s understanding of structural dynamics through the making process.
後述しますが,この人型無尾翼機による空気への働きかけが有効に働くように翼全体に曲面を与えていくのですが,その曲面自体がシェル2構造的な強さを生むことで安定した形と変化していく過程も体験することができます。
I will discuss in detail later how the wing configuration of the soft, small paper aircraft Aerodynamic Yajirobei is transformed into a stable form with shell-like structural strength, as its geometry is adjusted to effectively grip the air during flight.
他の材料の可能性を探ることも大事ですが,これまでの経験だと普通の折り紙では軟らかすぎるかもしれません。薄手の厚紙は意外に良かったのですが,A5サイズよりは大きめになります。座ったままで力も入れず,ほいと空気において飛行させるには,ハリのあるちょっとだけ厚めのコピー用紙とか,美術館や資料館でももらえるフライヤーなどに使用するやや高質な用紙が一番なのですが,まずは手元にある疲れていない,折り目がない,きれいな状態の普通紙のミスコピー用紙の再利用がもったいなくないかなと思います。でも,湿っていたりよれていたりすると,この後の工作には耐えられないかもしれません。空気と遊ぶにはそれなりの繊細さが必要になります☺
While it is important to explore the possibility of using other materials, based on my experience, ordinary origami paper may be too soft. Thin cardstock turned out to work surprisingly well, although it is slightly larger than A5 size.
To let it fly simply by gently placing it into the air—without standing up or applying force—the most suitable material seems to be slightly thicker, resilient copy paper, or the kind of high-quality paper used for flyers distributed at museums or archives.
However, I feel it would be a waste not to reuse clean misprinted copy paper that is not worn out, creased, or damaged. That said, if the paper is damp or wrinkled, it may not withstand the subsequent crafting process. To play with the air requires a certain degree of delicacy ☺
とにかく自分で作って遊んでみると,小さな何でもない形なのですが,大げさに言ってしまうと,そこに3つの力学(空気力学,剛体の力学,材料力学)への入り口が見えてきます。
In any case, once you actually make one by yourself and play with it, you realize that although it is a small and seemingly insignificant form, one could say—perhaps somewhat grandly—that it opens the door to three realms of mechanics: aerodynamics, rigid-body mechanics, and the mechanics of materials.
コピー用紙を利用した人型無尾翼機Aerodynamic Yajirobei Made with A5 Copy Paper
まずは,この形のポイントを体感しながら作ってみることを想定して,その制作手順をリストアップしてみます。図解はリストアップのあとで適宜説明していきます。
First of all, in order to grasp the mechanical characteristics of this form through hands-on experience, I would like to outline the process of making this small paper craft using misprinted copy paper. I will explain it in more detail with diagrams after presenting the following steps.
- A5サイズのコピー用紙(もったいないので,ミスプリントしたA4コピー用紙を半分にして使っています)の図心つまり重心を確認してください。
Check the center of gravity of the A5 copy paper (half of an A4 misprinted sheet, which I feel should not go to waste). - そのままで少し斜めにしながら落下させ,その動きを観察してみてください。ふわふわするだけで飛行しているとは言えないと思います
First, gently push the paper forward in the direction in which one of the longer edges serves as the front edge of the small aircraft. Tilt the “head” slightly upward from the vertical and observe its motion as it falls toward the floor. You will notice that it does not truly fly, but rather drifts down somewhat unstably. - 人型にするために,肩部(翼的には前縁,前進翼3となります)に切り込みを入れ,頭部にすべてを折り込んでみてください
To transform the A5 sheet into a more human-like origami form, as shown in the figure below, cut the paper at the “shoulder” positions and fold those parts inward beneath the “head” section. The resulting shape resembles a kimono-clad human figure. When viewed carefully, the two shoulders may also appear similar to the forward-swept wings of an aircraft. - 頭部の下に折りたたんで収納するとき,折り込み部のどこも切り落とすことのないように。これによってこのコピー用紙の重心位置は変わりません。重心位置が変わらないことが大事です。
No part of the “shoulder” should be cut off when it is folded inward beneath the “head”. This will ensure that the position of the centre of gravity remains at the same location even though the paper has been transformed into the Yajirobei. - 折り込み部分は,できるだけ少しのセロハンテープで巻きとめとくと良いかなと思います。ちょっとしたセロハンテープの使い方で,その見た目以上にその飛行特性に影響を与えてしまいます。
It is recommended that the “head”, after folding, be fixed with cellophane tape over as small an area as possible, because the balance is so sensitive that the amount of tape and the way it is applied on the surface strongly affect the flying performance as well as the appearance. - それから,頭の重さで首が下がらないように首筋から背中にかけて,アスリートのテーピングのように,少しだけテンションを掛けたセロハンテープを,紙によりが入らないように注意しながら貼り付けてみてください。
Attach the cellophane tape carefully, with appropriate tension, along the upper side from the neck to the back, similar to the way athletes tape their legs, ensuring that the taping does not produce local wrinkles on the surface. - 上面から見ると図心(重心)は後方(頭部と反対側)に移動するので,重心と空気による風圧中心4の位置にズレがでてきます。このズレが安定した飛行につながります
From the upper viewpoint, it can be confirmed that the apparent centre of air pressure moves backward, creating a difference between the positions of the centre of gravity and the centre of pressure. This difference contributes to stable flight. - 勢いをつけることなく(決して投げないでください)斜め前に静かに放し,1m以上の飛行距離を目指します。おそらく,コピー用紙に非対称な形の癖を与えることなく制作を続けていたら,きれいに頭から落ちていくことになると思います。それで正解です
Tilt the “head” slightly upward from the vertical and drop it quietly without applying any initial speed, aiming at first to reach about 1 m forward. It may move straight downward from the head unless the copy paper has been slightly deformed, in which case the shape becomes asymmetric. This state is normal in the making process. - この急降下を止めて前に飛行させるためには,人型の脚部(翼的には後縁)への形の工夫が必要です。後縁を少しだけ上に凹になるように,つまり気持ち軽く反り上げるようにしてあげると,その急降下から回避されます。反り上げすぎると,行き足がとまり,ふらふらと落ちてしまいますので,反り上げ具合での“手加減”がとっても大事になります
To achieve stable forward flight while avoiding a straight downward motion requires some ingenuity in shaping the rear edge of the Yajiobei. If the rear edge is bent slightly upward, such a fatal flight can be avoided. However, the flight may become unstable again if the bending is too strong, because the increased air drag decreases the speed of the Yajirobei. Here, the degree to which the rear edge is bent with the fingertips is important. - ここまではA5サイズからの紙片の切り離しは一切行っていませんので最初の重心位置に変化がありません。
次に,飛行距離を延ばすために,より人型に向けて加工を加えていきます。飛行にとって不必要な部位を切り離し,空力的なバランス改善と総重量減を目指します
So far, no part has been cut off. Therefore, the centre of gravity remains at its initial position.This Yajirobei will be continuously improved in order to achieve longer flight. Next, aerodynamic balance will be realised, and the total weight will be reduced as some parts of the original Yajirobei, which may not be necessary for flight, are cut off. - 人型としての形が整ったら,3m以上の飛行を目指します。この程度飛行できれば,自由落下と違いが体感できると思います。後縁中央つまり足元をつまみ,無理のない程度に水平を保ちながら軽く前に押し出すように放します。力を入れて投げてしまいますと,翼面から空気が剥がれてしまい,飛行は難しくなります。静かに穏やかに前に軽くポンと押し出してみてください。力は不要です。
Aim for a flight of over 3 m after the Yajirobei has been adjusted, during which the figure will transform into a form resembling a person wearing a kimono. I believe you will then be able to experience clearly the difference between free fall and this gliding motion. Gently and calmly push it forward while keeping the figure horizontal, pinching the rear edge (tail-like leg). If the pushing force is even slightly too strong, the air around the wing surface of the Yajirobei will separate, and it will not be able to fly. Basically, very little force is needed.
A5の重心を求める To define the centre of gravity of the A5 copy paper
A5コピー用紙の重心は四隅の対角を直線でつなぎ交差する点が図心であり,紙厚が同じで,さらに紙全体で均一な材料である限りは,その図心と重心は一致します。当然のことなのですが,図心と重心が一致した状態では空力的に安定を取ることは難しいので,まずは図心,重心を再確認することは素直に大切かなと思います。
The centre of gravity of the A5 copy paper coincides with the geometric centre, which is defined as the intersection of the two diagonal lines connecting opposite corners of the paper, as shown in the figure below. To be strictly precise, it should be added that the geometric centre and the centre of gravity coincide at the same point only if the copy paper has uniform thickness and density throughout.

この状態で試みに飛ばそうとしても,そううまくはいかないと思います。決して折り込みを入れて,いわゆる紙飛行機にしてしまうと,ここでの目的からずれてしまいます。
It may be difficult to make the copy paper fly in the above state. At this stage, you should not try to fold it into a conventional paper craft form. The purpose of this workshop would be lost if you tried to make the paper fly based on common assumptions of origami or paper craft.
ここでいう図心は、かなり粗い近似ではありますが、紙を水平に空気中に静かに置いたと仮定したとき、その紙が空気から受ける圧力は紙全体に一様に作用しているとみなし、その図心がその圧力を代表する点であると捉えることができます。このような理解は、紙遊びの中での実感覚としても、あながち否定すべきものではないように思われます。
このときの空気による圧力のを図心と一致させ,それを風圧中心として仮定してみると,次に進めそうです。
What the geometric centre represents may be understood, albeit as a rough approximation, as the point that represents the overall pressure exerted by the air beneath the paper, if the paper is placed horizontally and allowed to rest quietly in the air.
This way of understanding does not seem to be unreasonable, even as an intuitive feeling gained through playing with paper.
We move on to the next phase of the process if the geometric centre can be assumed to coincide with the centre of wind pressure.
重心と風圧中心(図心)が一致しているとき When the centre of gravity and the centre of wind pressure (geometric centre) coincide:
A5用紙は,風圧中心において空気の力で支えていると考えると,その支点には重心もあることになります。普通のやじろべいがスウィングしながらもつり合っていられる一番の理由は,重心と支点との間に距離があることに尽きます。もし距離がないとすると,自電車の車輪を車軸で支えたときのように,どこでもつり合ってしまうために,いったん回り始めたらその方向に回り続けることになります。このことは,風圧を受ける(風圧中心によって支えられている)A5用紙も安定しないことになることと基本的には類似していると思います。
The unprocessed A5 sheet may be considered to be supported by the force of the air acting at the centre of wind pressure; in this case, the centre of gravity is identical to the centre of wind pressure.
This means that there is no distance between the two centres. If the centre of wind pressure is regarded as a support point, as in a conventional Yajirobei toy, the dynamical state may become unstable, and balance may not be maintained.
重心から風圧中心をずらす Shift the centre of wind pressure from the centre of gravity
やじろべいにしても起き上がり小法師にしても,支点と重心が鉛直方向に並んで静止しているときを基準に考えると,支点回りで回転したときにそれぞれの重心は,静止時の支点との位置関係に戻るような復元力(復元するように働くモーメント)が生まれるしくみになっています。この復元作用が生まれるためには支点と重心の位置がずれている必要があるのです。
In a conventional Yajirobei or a self-righting doll, the fulcrum and the centre of gravity are aligned vertically at rest. If the system is slightly tilted, a restoring force or moment arises to return it to its original state. For such a restoring force to arise, a misalignment between the positions of the fulcrum and the centre of gravity is necessary.

まずは,重心の位置と風圧による支点である図心の位置をずらすことを考えます。両肩のみに切り込みを入れ,頭部の下に折り込んであります。その結果,重心位置には変化はありませんが,風圧中心は変化することはイメージできると思います。
First, we consider how to shift the position of the fulcrum—which corresponds to the centre of wind pressure—and the centre of gravity in the aerodynamic Yajirobei, as shown in the figure.
Both shoulders are cut in, and the parts are folded into the underside of the head. As a result, it becomes clear that the position of the centre of wind pressure has changed.
左右対称ですし,頭部に折り込まれた部分の質量は折り込み前と変化はありませんので,重心位置は変化しないと思います。それに対して肩口を外され,頭部のような形がでてきた状態で受ける風圧の中心は,感覚的で申し訳ないような気もしますが,空気に対峙する面積が多い下部に移動することは容易に想像できると思います。
この風圧中心はあくまでも,ここでのメカニズムを説明するための仮のものですが,実際の動きの様子を見ていると,それほどポイントを外していないようにも思えます。
この状態で飛行させようとしますと,頭部を下げる方向に回頭しながらほとんど真っ逆さまに落ちていきます。団扇の柄を頭部として軽くポンと投げたときと同じ状態です。
Although the centre of wind pressure alone cannot fully explain the flying mechanism of the Yajirobei, this trial definition may still be adequate for that purpose.
In any case, this Yajirobei, which is still in the middle of development, falls almost perpendicularly with its head pointing downward when we try to make it fly horizontally. The style of the motion is similar to that of a traditional Japanese fan when it is lightly pushed forward, in which the stem of the fan plays the role of the head.
飛行するために To make it fly
重心と図心・風圧中心をずらすだけでは飛行しないことは明確です。では,次にできることは対処法に過ぎないのですが,頭を下げないような力を空気から得ることです。
As a result, it becomes clear that the Yajirobei is difficult to fly with only the misalignment between the centre of gravity and the centre of wind pressure. What we can do, then, is to introduce another point of air pressure that may support the head position, helping to maintain the horizontality of the aircraft during flight.


今一度,飛行する鳥たちの様子を見てみますと,このようにとっても自然な流れを持った曲線と曲面でその形が構成されていることが分かります。今回,参考にすべきポイントは,翼の前縁に該当する翼端での曲面変化と後縁に該当する尾の形だと思います。尾の先端でのわずかな反り上りが確認できます。この形に添うように空気が流れ,圧力変化が生まれ揚力と抗力5,そして鳥本体の重量がバランスを取りながら飛行することになります。さらに,前縁でのねじり下げも,空気を翼面の上で前方から後方に流すためにはとても有効です。
If we carefully observe the shapes of the wings of flying birds, we notice that they consist of various curves and surfaces with a natural flow. In this context, there are two key features to which we should pay attention: one is the shape of the leading edge (the front edge of the wing), and the other is the shape of the trailing edge (the rear edge of the wing).
At the end of the trailing edge, a slight upward warping can be observed. The air surrounding the wing flows along its surface, and lift and drag are generated by differences in air pressure caused by this airflow. Birds fly through a dynamic balance between these aerodynamic forces and their own weight.
Moreover, a forward twist of the leading edge of the wing helps to induce a smooth airflow from the front edge to the rear edge along the wing surface.
とりあえず,人型無尾翼の後縁を気持ちだけ反り上げてみます。

上図の赤線が翼の断面の様子(翼型)を示しています。後縁の反り上げは強すぎですが,これでも3m越えの飛行はできるようになりました。この反り上げによって,後縁で空気からの押し付け力(下向きの逆揚力ということになります)が期待できます。この部分の空気の力,風圧の代表点として緑のマークを追加してあります。
これで,重心の黒マークと風圧中心(揚力の代表点)の青マーク,逆揚力代表点の緑マークでの力関係を確認するために,この様子を真横からの模式図として示しますと,
The red line in the figure above shows the cross-section of the wing. Although the degree of warping at the trailing edge may be somewhat too strong, even this form can fly over 3 m simply by being dropped. Another aerodynamic force, which may be regarded as an inverse lift, is expected to act on the trailing edge. The point corresponding to the centre of this air pressure is indicated by the green point.
As a result, the dynamic relationship between the centre of gravity (shown in black), the centre of air pressure responsible for the lift of the wing (shown in blue), and the point responsible for the inverse lift (shown in green) can be confirmed in the diagram below.

のように示すことができます。
In the diagram, the mg vector represents the gravitational force acting on the entire Yajirobei, the L vector represents the lift generated by the wing, and the L’ vector represents the inverse lift. Furthermore, a and b denote the distance between the mg vector and the L vector,
この人型無尾翼機が飛行している状態では,重心にかかる無尾翼機の機体重量と,風圧中心で代表される翼全体での上向きの揚力と,そして後縁反り上りによる下向きの逆揚力の3力によるモーメントのつり合いが成立することになります。
When the Yajirobei is flying, the three forces — mg, L, and L′ — maintain a dynamic balance based on the principle of the lever.
図中の式は、風圧中心を支点としたシーソーのような状況を表しています。「モーメントのつり合い」という表現に抵抗がある場合には、「てこの原理」を思い出してもらえると、そこで何が起きているのかを体感的に理解しやすいのではないかと思います。
The equation in the figure below expresses a situation similar to a seesaw, in which the support point corresponds to the centre of air pressure, L. If you feel uncomfortable with the expression “the balance of moments”, please recall the principle of the lever. By imagining the mechanism of a lever, you may intuitively understand what is happening here.
ここまでの説明では,重心以外のマークの位置は感覚的/概念的ですので,もう少しこの人型無尾翼機を仕上げて行った後に,その機体に対するCFDによる圧力分布の数理的な確認を行いたいと思います。今は感覚的なレベルでの説明でお許しください。
So far, in this explanation of the flying mechanism, the positions of L and L′remain imaginary or conceptual, unlike the centre of gravity. Therefore, I will carry out some simple scientific or numerical simulations of the flying Yajirobei using CFD (Computational Fluid Dynamics) in order to clarify the balance of aerodynamic forces later.
さらに遠くに Flying Further

少しでも飛行距離を伸ばそうとすると,短絡的ですが,頭を下げようとする効果を低減すればとの考えにたどり着きます。
Although it is a rather simplistic way of thinking, it seems natural to assume that the downward pitching effect of the head of the Yajirobei should be reduced if a longer flight distance is desired.
そこで,これまではA5用紙から1㎜たりとも切り離していないのですが,上図のように,全体のバランスを伺いながら先端を切り落としてみます。これにより,初めて重心位置に変化が起き,ここでは風圧中心に歩み寄ることになります。
So far, no part of the original A5 sheet has been removed. At the next stage, however, a small portion of the edge of the head is carefully cut off step by step, considering the overall balance of the Yajirobei. Through this process, the centre of gravity shifts, and the distance between the centre of gravity and the centre of air pressure is reduced. At the same time, the position of the centre of air pressure also changes a little.
そうすると,頭を下げようとするモーメントは弱くなるので,その飛行にややふわふわ感が生まれ,飛行距離が伸びる傾向にあります。
As a result, the moment causing the head to pitch downward is weakened. The flight pattern becomes gentler and more buoyant as a whole, and a longer flight distance can be expected to some extent.
この方法で40㎝程度は飛行距離が伸びましたが,やりすぎると,A5用紙そのままの状態と同じで,重心位置と風圧中心にずれがなくなり,前に向かって飛行する性質を失う場合もあります。頭を下げる効果を不用意に低減してしまうと,後縁でも空気の流れが,この動きのもたつきを引き起こし,“飛行”というよりは安定しない“浮遊”になってしまいます。
In this way, the flight distance can be increased by about 40 cm. However, if too much of the head is cut away, the distance between the centre of gravity and the centre of air pressure becomes similar to that of the original A5 sheet, and the tendency to fly forward is lost.
If the downward pitching effect of the head is reduced too much, the airflow around the trailing edge of the wing is no longer smooth. As a result, the flight becomes unstable; indeed, it can hardly be called “flight” and may instead be described as merely floating or fluttering.
空力ヤジロベエへ Towards the Aerodynamic Yajirobei
ここまでで準備運動は終わりましたので,もう少し飛ばすこと考えたいと思います。
ここまでの作業で体感できるのですが,後縁両サイドの面は揚力を生む以上に空気の粘りを受けやすく,むしろ飛行に関してはその行き足を止める抵抗となっていそうです。同時に,普通のコピー用紙でやっているので,その軟らかさのために翼中央から離れれば離れるほど空気と共に動きやすくなり,その流れを乱しているようです。
Now that the preliminary training stage of the Yajirobei is complete, let us try to make it fly even further.
The two outer portions of the trailing edge of the wing seem to be more affected by the viscous drag of the air than by the generation of lift.
At the same time, because the Yajirobei is made from ordinary copy paper, the wing is relatively flexible. The two outer trailing-edge sections move easily in response to airflow, since the flexibility increases with distance from the centre of the wing. Consequently, these edge regions appear to disturb the airflow around the rear part of the wing.
空力ヤジロベエ2号機 The Second Aerodynamic Yajirobei
初号機については,このブログの最初に掲示してありますが,その三次元形状を取得し,CFD解析6まで実施しておきながら,どこかに大事にしまい込んでしまいました。そこで,色は異なりますが同じ紙質の厚めのコピー用紙で同様な形の2号機を再現してみました。
As for Unit 01, which is shown at the top of this blog, I ended up storing it away carefully, even though its three-dimensional shape had already been measured with a digitiser and CFD analysis had also been carried out. Subsequently, I attempted to reproduce a similar Yajirobei (Unit 02) using the same material, namely a somewhat thick copy paper. I do not think that the difference in colour from Unit 01 matters.
翼全体による総揚力を低下させることにはなるのですが,同時に上記ような理由による抵抗も低減できることが期待できるので,次のように後縁両翼を切り落としてみました。
Cutting off the outer portions on both sides of the trailing edge of the wing reduces the total lift generated by the wing as a whole. At the same time, it is expected to reduce the drag around the rear edge of the wing. For this reason, these rear portions were removed, as shown in the figure below.
これにより,また重心位置も変化しますので,前述の3力点:重心点,揚力点,逆揚力点の位置関係も,そしてその点にかかる力の大きさも変化するので,空力的なバランスも変化することになります。
As a result, the positions and magnitudes of the centre of gravity, the lift, and the inverse lift acting at the tail, are altered from their original states. Consequently, the dynamic relationship between these three force points, which together determine the aerodynamic balance, is also transformed.

試し飛ばしが過ぎて,障子にぶつけながら飛行を繰り返していますので首が少しずれていますが,高さ1.6mぐらいから斜め前に押し出したときに5m程度は飛行しています。ほとんど初速は与えていないので重力と揚力の差による加速で,時々障子を破いてしまうぐらいの勢いはついています。家族には怒られます☺
After many trials, the neck has become slightly deformed as a result of repeated test flights and collisions with the Japanese paper screen. Nevertheless, the flight distance has reached around 5 m when launched from a height of 1.6 m. Although the initial speed is close to 0 m/s, the Yajirobei accelerates only through the imbalance between gravity and lift, and its flight speed can occasionally become high enough to pierce the paper screen.
飛行させるための形の与え方 How to Form a Shape That Can Fly Naturally
基本は鳥の飛行形態と同じです。特に彼らの肩から背,そして尾っぽへの特徴的な曲線とそれによって構成される曲面に倣いながら,前述の3力点によるモーメントのバランス(つり合い)を意識・イメージしながら曲面をつけていけば,あまり手を入れることなく飛行し始めます。
Basically, the idea is the same as imitating the physical characteristics of flying birds. The Yajirobei will begin to fly naturally without any special shaping of its surface if you adjust its form while imagining the balance between the three forces mentioned above, following the natural curves that continue from the shoulders, along the back, and towards the tail of a bird.
むしろ,手を入れすぎると,用紙がもともと持っていたハリの強さを失わせ,空気とうまくかかわることができなくなります。制作および調整においては,用紙もともとの表面の状態を維持しつつ,飛行のために必要な空力バランスが取れるように,その形を誘導することに尽きます。これは,大げさですが,自然素材に必要以上な作為を押し付けるのではなく,必要最低限な働きかけにより道具として生かしてきた先人たちの知恵にも似たところが出てきます。
Rather, if the paper craft is manipulated too much, its original and natural properties are lost, and the shape can no longer maintain a good relationship with the surrounding airflow during flight.
When modelling and adjusting the shape of the Yajirobei, it is important to guide it towards a form that can achieve aerodynamic balance while preserving the original physical properties of the paper.
Although this idea may sound rather ambitious, I think that this process is similar to the traditional wisdom by which natural materials have been transformed into a wide variety of tools through the minimum necessary modification, without imposing excessive artificial intention or impairing their original characteristics.
以下に形の与え方のポイントをリストアップしておきます。
The key points in forming the Aerodynamic Yajirobei are as follows.
- 前縁両サイドの鋭角三角形の部分は肩口から翼端に向けて,やや強めに曲げ下げていきます。これにより,空気の中を移動し始めるときに空気がうまく翼面をなめていくことになります。当然なのでが,ここで折り目をつけてしまいますと,復活させるのはかなり困難なことになります。そのこともあり,この曲げ癖を付ける過程では繊細さと紙からの応答,曲げに対する反応への意識をしっかり保つことが大事です(下図のポリゴンメッシュデータを参考にしてください)。
The front edge of the wing is gently bent downward on both sides. This continuous curvature allows the air entering from the wing tips to flow smoothly over the wing surface as the Yajirobei moves forward.
The important point is not simply to fold the paper as in ordinary origami. If the wing is folded sharply, the airflow cannot follow the surface smoothly, and it is difficult for the paper to recover its original continuous curvature. Therefore, the bending process requires careful handling so that the natural continuity of the wing surface is preserved.
The mesh model shown below was captured using a 3D digitiser from a Yajirobei that achieved a relatively long flight distance. - この構造では,基本的に首の付け根に弱点が生まれます。どうしても頭を垂れて猫背になります。ほどほどに猫背になることは空気の流れ上は悪いことではないのですが,垂れすぎると抵抗と頭下げの力を強めてしまいますので,頭頂から背中中央部にかけて,下図のようにセロハンテープに適度にテンションを掛けながらテーピングを行います。
これによって,首はあがり,良い姿勢で空気中を進むことになります。ただ,テンションが強すぎると,首の付け根から背にかけての上へ凸のカーブが失われ,最悪凹カーブとなってしまいますと,この主揚力を受ける部分の揚力の向きは上下反転することになりますので,“良い加減”でのテーピングが肝要です。
Adjustment of the Neck Curvature:This structure tends to be relatively weak around the root of the neck. As a result, the head tends to bend downward, and the upper back can become slightly hunched. If this tendency is moderate, it can actually improve the airflow over the surface of the Yajirobei. However, excessive downward bending increases both aerodynamic drag and the downward pitching effect.
To adjust the degree of bending around the neck, strips of transparent adhesive tape are applied under appropriate tension. The tape is attached along the upper surface of the Yajirobei, extending from the tip of the head to approximately the middle of the back. Because the tape tends to contract slightly after being applied, it gently bends the surface into a shallow concave shape. On the other hand, the paper itself naturally tends to recover its original convex shape. As a result of these opposing effects, the surface is adjusted to an appropriate aerodynamic curvature, allowing the airflow to follow the surface smoothly and generate lift. - テーピングはもう一か所必要です。特に使用する紙質が軟らかい時は,こんなに小さくても重力に負けて,両翼端に行くほど下に撓んでしまいます。鳥も空気をうまくつかみ滑空しているときは,肩から翼中央付近までは,いろいろなケースにおいても上に軽く反りあがるような感じになっていますので,この空力ヤジロベイにおいても,テーピングによって,左右の翼(腕)が水平もしくは少し上反角をもって形が安定するようにして挙げるとうまくいきます。ここでも上反角をつけすぎますと,ただの紙飛行機となり,力技では飛ぶように見えますが,空力ヤジロベイとしての落ち着きはなくなります。
In addition to the taping from the neck to the back, horizontal strips of tape should also be added to both wings.
When the paper is relatively soft, the wings tend to bend downward under their own weight, even though they are very light. In many situations, the wings of real birds also tend to curve slightly. However, in the case of birds, the wings tend to curve slightly upward from the shoulder towards the middle of each wing when they catch the air well and glide. In the same way, the two wings of the Yajirobei can fly more effectively when their shape is stabilised with a slight upward angle produced by the horizontal taping.
However, if the upward angle is too acute, the Yajirobei loses the character of an interesting paper craft shaped in a natural way. Although it can still be thrown forcibly, its flight tends to become more like a simple parabolic trajectory than a flight naturally supported by lift. - そして,この水平に張っているテープの上端辺りに沿って,鳥の背のような,カーブを軽めにつけてください。このカーブをつけすぎるとすべてのバランスを崩すことになります。
- 同時に,尾っぽの部分は上に反らしてください。こちらは意外と強めに曲げても致命的になることは少ないのですが,やはりロングフライトを目指すなら,ほどほどの反り上げから始めてみるのが無難です。
空力ヤジロベエ周りの空気の流れ
ここでは,空力ヤジロベエ初号機がもっとも自然に飛行したときに採取した3D形状データに対する分析とCFD解析に結果,そして,そこから目見えてくる空力ヤジロベイのメカニズムの再確認を行いたいと思います。
空力ヤジロベエのCADモデル
当時MINOLTA製の三次元デジタイザVIVID910により,釣れたての魚を取るように,最長飛行距離を出した時の初号機の3D形状を取得し,その点群から下図のようなポリゴンメッシュデータを得ました。

この図より,空力ヤジロベエの曲面のつながり方が確認できると思います。気のせいかもしれませんが,結果的に鳥の飛行形態に近づいているように見えます。
このデータをCAD(KeyCreator)にもっていき採寸作業も行ってみました。この図面を見ながら初号機を再現することもできそうです。

この図面より,尾っぽの反り上りの程度が確認できると思います。
CFD解析
3D測定は一方向からのみでしたので,この空力ヤジロベエ3Dモデルの翼の厚みはありません。CFD解析において「壁」と認識してもらえる程度の厚みが必要ですが,実際の厚みではなかなか解を収束させることが難しかったので,今回は,CADにおいて解析可能な程度に厚みをつけてあります。
今回のCFDはFlowsquare+を使ってみました。大事なところまでフリーで実施するころができ,流線も自然に観察できるので,門外漢でありながらも素敵なCFDの一つであると感じています。内容的には移動壁としてシミュレーションすべきかなとも思いますが,まずは風洞実験と割り切って,空力ヤジロベイは空気の流れにある固定壁としてシミュレーションを実施してみました。
空気を流し始めてから2秒後ぐらいの進行方向の空気の流速を見ますと

空気は左から一定の速度で流されているので,この図では翼面での空気の流れはすでに安定しているようです。この図からも,他の部分での流速の様子と比較すると後縁上部での流速の減速が確認できます。このことと逆揚力との関係を確認するために,こんどは空気にかかる圧力の分布を確認しますと,

3力点のうちの揚力点辺りの下面に顕著な+の圧力が分布し,逆揚力点付近では,下面に強めのーの圧力が分布していることがわかります。つまり,揚力点では上向きの力,逆揚力点では下向きの力がかかることが確認できます。この結果は,前述の3力によるモーメントのつり合いを表す模式図の内容と一致していると思います。
参考までに,このときの空気の流れも確認しておきましょう。

これは空気を流し始めてから約1秒後の流線の状況です,この段階では翼面を回転しながら移動す興味深い渦も確認できます。おそらく,有機的な曲面のつながりによるものと思いますが,現時点では,気になる!程度の言及で留めておきます。もっとしっかり勉強して,もっとパラメトリックに工作,モデル化,CFDを実施しないとこれ以上のことは言えないように思えます。ただ,よく飛ぶ機体とそうでない機体との翼面での空気の流れの差異はこの方法でも確認でき,機体デザインにはいかせるかもしれません☺
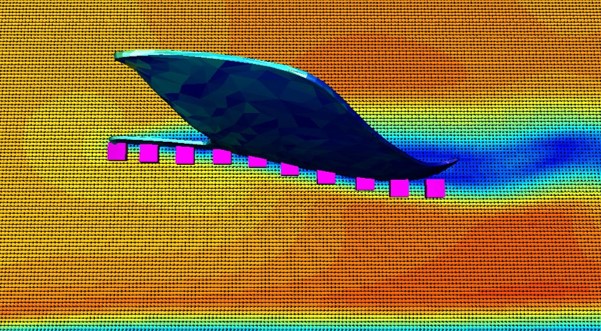
プローブによる圧力変化の確認
Flowsquare+のプローブ機能7を使って,圧力分布を数値的に確認してみました。プローブは下図のピンクの小さなボックスです。


このプローブから測定された翼の上面と下面の圧力と,それらの圧力差を図に示しますと,

となり,頭部よりでは上向きの力,尾の辺りでは下向きの力がかかっていることを定量的にも確認できました。
この結果を今一度,CFDの図に戻してあげると,

あらためて3つの力のバランスの様子が可視化でき,空力ヤジロベエの飛行のメカニズムを確認することになると思います。
ぜひ,まずは身の回りにあるもので,自分の手で作ってみて楽しんでみてください。そうして,ここで可視化した空気の流れもイメージして見てください。
補足説明
- フラッター:飛行機の翼のように弾性のある構造が,空気の力によって振動することがあります。低速飛行ではこの振動は空気の力で抑えられますが、その弾性と空気からの働き掛けの度合いとの関係性において,ある程度の高速となると,逆に空気の力がその振動を強くしてしまうことがあります。旗が風によって激しくはためいているときも似たようなことが起きています。この現象が増大すると実機では大変なことになりますが,この紙飛行機だと翌端での繊細な振動が見られることがあります。 ↩︎
- シェル:まさに貝殻ですが,ここでは卵の殻的な構造としての強さをもつ構造との理解でもいいかなと思います。平面状態のコピー用紙は自立できませんが,曲面を与えることで形を保ちやすくなります。参考までに卵の殻はモノコック構造と呼ばれる方が多いかなと思います。このモノコック構造はシェル構造の中の一つの特徴的な構造形態であるとの理解で良いかなと思います ↩︎
- 前縁翼:一般的な小型機や滑空機が機体の飛行方向真横に翼を伸ばし,ジェット機の多くは,その左右の主翼を対象にやや後ろに伸ばしています。これを後退翼と称するのですが,ここでの人型は主翼を前に伸ばすことになります。空気の流れとしては多くのメリットがあるのですが,構造的にはいろいろと解決すべき課題を抱えることになります。その一方で,中型から大型の鳥の翼の形を見ていますと,肩口付近では前進翼的になっていることに気づきます。 ↩︎
- 風圧中心:ここでは,飛行中に紙面が空気を押すことによる空気からの反力全体の代表点的なものとの理解でいいかなと思います。物体の重量を重心に集中させて理解するように,紙面全体が空気から受ける力を「空力中心」一点で代表するように考えます。 ↩︎
- 抗力:抗力は飛ぶことを阻害するとの印象を持ってしまうかもしれませんが,団扇で空気を仰いで風を送るときは,抗力によるものと理解してもそれほど間違いではないと思います。ついでに団扇で揚力を利用するなら,かつてのお座敷芸のように扇を飛ばすように,柄を前にして適度に浅い角度で空気の中に投げ込むと飛んでいるように見えるときがあります。団扇の面を仰ぐ方向と平行に置くと,空気に対して何の働きかけもしませんが,少し角度をつけてあげると,団扇の動かす方向とクロスする方向に空気から力を感じることができると思います。これが揚力です,と言いたいところもありますが,このときの力は揚力と抗力の合成力と理解したほうが現実的かもしれません。そして,仰ぐ方向に面を向けると,反対方向に空気からの抵抗を感じるでしょう。これが抗力です。 ↩︎
- CFD解析(数値流体力学解析):ここでのCFDはComputational Fluid Dynamicsのことです。Business関連では別の意味でも使われているようです。CFDは,コンピュータを用いて流体の挙動を解析する技術です。 ↩︎
- https://fsp.norasci.com/display.html#probe ↩︎
コメントを残す